Creating an Intercom
Creating an intercom is very easy. With Web Comms we don't limit the number of resources you can create in an intercom which means you can design your intercom exactly how you require without having an active license.
Get Started
Ensure you’re logged into your account and navigate to your intercoms page
In the sidebar on the left, click to open the intercom creation dialog.General Settings
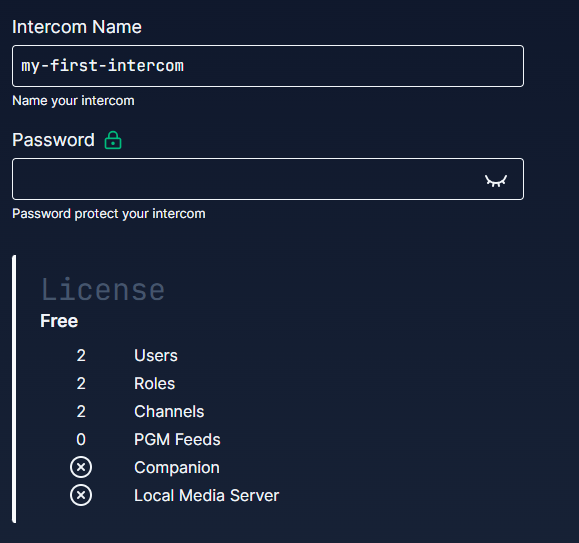
Intercom Name
Here you can type an intercom name of your choice. Names cannot include any spaces, capital letters or punctuation outside of hyphens (-). The intercom name must also be unique to your workspace. You cannot have two intercoms with the same name.
Intercom Password
Here you can set a password which other users will need to enter to access your intercom system. You can also view the password at any time by toggling the / buttons. Intercom passwords are encrypted and securely stored in the Web Comms database. This is also a licensed feature, so whilst you are able to add a password, it will only actively protect the intercom when there is an active license connected to the workspace.
License
This is a summary of the license limitations connected to the workspace. Limitations only affect the live intercom and do not affect creation or editing.
Matrix
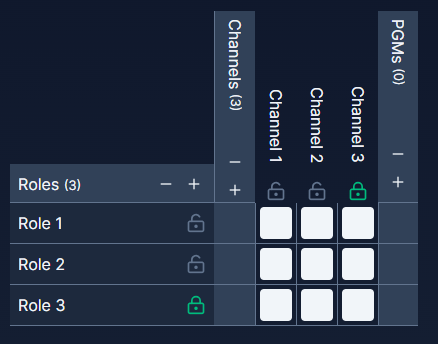
The matrix is where you can easily configure the number of roles, channels and their respective permissions in the intercom system. An unlocked padlock next to any resource indicates that it will be available to you in the live intercom on your current license, while a green padlock indicates that the resource is unavailable on your current license but will become available upon upgrading the license.
Roles
In the first column on the left of the matrix are a list of the roles available to select within the system. Every newly created intercom starts with two default roles names ‘Role 1’ and ‘Role 2’. To change the name of a role, click on the name and type the new name you wish the role to have. This can be the name of a group such as ‘Camera Operators’ or a specific role within the production such as ‘Director’.
Roles can be added or removed from the system by clicking the - / + buttons on the heading. The + button will add a new role to the bottom of the list, whilst the - button will remove a role from the bottom of the list.
Channels
Along the top heading row of the matrix are the channels available within the intercom system. As with the roles you can click the - / + buttons to remove or add channels available within the system. Also like with the roles, clicking on the name of a channel will allow you to rename it, regardless of if the channel is licensed or not. The channel names should be reflective of the topics to be discussed within that channel such as ‘Production’ or ‘Encoding’. The channels within Web Comms are designed to mirror the kind of partyline channels that can be used in other professional grade intercom systems.
Point to point channels can be created by limiting channel access to only one pair of users. More on this in the next section.
PGMs or Program Feeds
Program feeds are a major new addition for Web Comms 2.0, they allow for intercom owners to stream live video through the intercom server at a low latency. This is incredibly useful for providing low latency program feeds for all intercom users and even clients to allow for easier collaboration in a live environment. Due to the way that WebRTC technology works this latency will never be as low as using phyiscal SDI/NDI/HDMI signals, but is often low enough in a remote production environment to be absolutely worth utilising.
A PGM feed can be added in the same way a channel can, by using the - / + buttons, and can also be renamed as with other intercom resources by clicking on the name.
Configuring the Matrix
The grid in the center of the matrix details how roles interact with channels and assigns permissions to them. The current default is the white square:
This indicates that the point on the grid where a chosen role and chosen channel meet will have the ‘Duplex’ permission, meaning that given role can both talk into and listen to that channel. Clicking on the crosspoint square will cycle through the permissions available which are as follows:With PGM Feeds, the only allowed crosspoint types are listen only or disabled.
Example Matrix Configuration
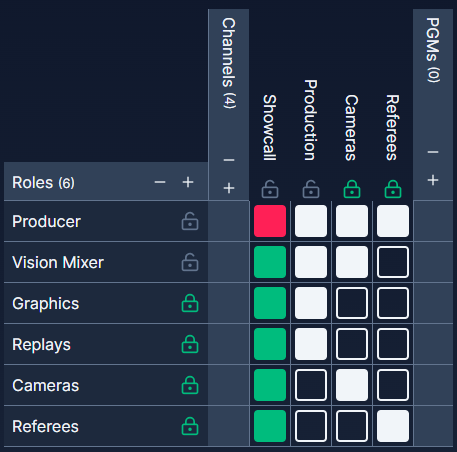
Above is an example matrix configuration for a mid size production. Lets go through it role by role.
Producer will call the show and exhibits overarching show control. For them we’ll create a showcall channel that they can only talk into and everybody else can listen to meaning one undisputed voice calling the show. They then should have full duplex access to the remaining channels to be able to connect the different teams.
Vision Mixer will be cutting between different camera shots along with telling the camera operators what shots they need to prepare. For this reason they should have duplex permissions on the cameras channel. They’ll also need to communicate with the graphics team for different graphics key utilisation, so they should also have duplex permissions on the production channel to communicate with them. They will also need to hear the show call channel, so that is set to listen only.
The showcall channel is a safe channel that only the producer can be heard down. This means that if a user such as the vision mixer has too many channels active at any one time, they can adjust the volumes and at the very least isolate the producer to hear required show cues.
Graphics will need to hear what graphics the producer calls for so will have listen only on the showcall channel but duplex permissions on the production channel to communicate with the vision mixer.
Replays has the same configuration as graphics above. In a larger system they may have access to talent talkback to coordinate commentary over specific replays.
Cameras only really need to hear the showcall channel for context and the instructions from the vision mixer, so we’ll set the showcall channel as listen only but the cameras channel as duplex.
Referees often don’t need to hear all of the comms surrounding the broadcast but need to work together coordinating teams or players. They’ll work mainly in their own dedicated channel, but also being able to respond to the Producer should the producer need to ask something to one of the referees.